
.PNG)
.PNG)
.PNG)


.PNG)
.PNG)
| Bookmark Name | Actions |
|---|
Funding
Infinity Onboarding provides a fund transfer feature by using which you can transfer funds to the products that you selected while opening an account.
Funding is an optional feature that you can choose after submitting your application. Funding request can only be raised if your application is auto-approved.
NOTE: For the 2020.07 version, Funding is applicable only to the existing users. But, from 2020.10 version onwards, Funding is available to the new users or prospects too.
Funding can be internal or external.
- Internal Funding: Bank’s existing customers can fund their new accounts by using an existing account with the same bank. Internal Funding involves an intra-bank transfer.
- External Funding: As new users do not have an existing account, they can fund the account with an external account of another bank. External Funding is also available for existent customers. It involves an inter-bank transfer.
Funding process comprises two steps:
- Raising a Fund Transfer Request: When a funding request is raised, it is stored in the Journey Manager along with the rest of the application data.
- Executing the Fund Transfer: The execution is invoked after an account is created in the backend. The execution of fund transfer varies depending on the type of funding.
Internal funding is executed through Quantum workflow by using Payment Order Container microservice (if the applied business outcome is microservice based) or Transact IRIS APIs (if the applied business outcome is Transact based). To know more about the business outcomes, refer to Business outcomes.
But, external funding is not executed through a payment gateway. It can be implemented as an L2 (Country-specific) or L3 (Customer-specific) feature, if required.
NOTE: Currently, the Infinity Onboarding app supports only the Raising a Fund Transfer Request process.
Funding provides the following two options:
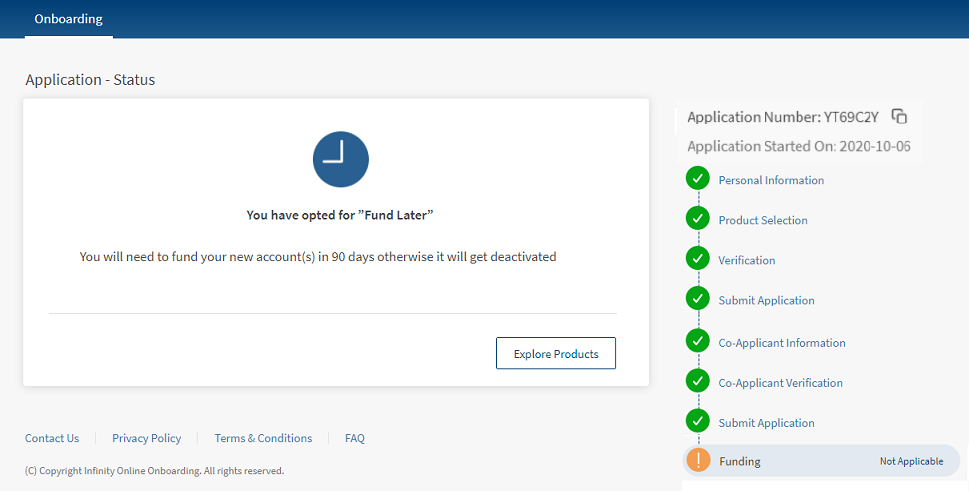
Fund Later
If you intend to fund your account at a later point of time, click Fund Later on the Application Status screen. The following screens appears:
Fund Now
If you intend to fund your account immediately, follow these steps.
- In the Application Status screen, select the Fund Now option.
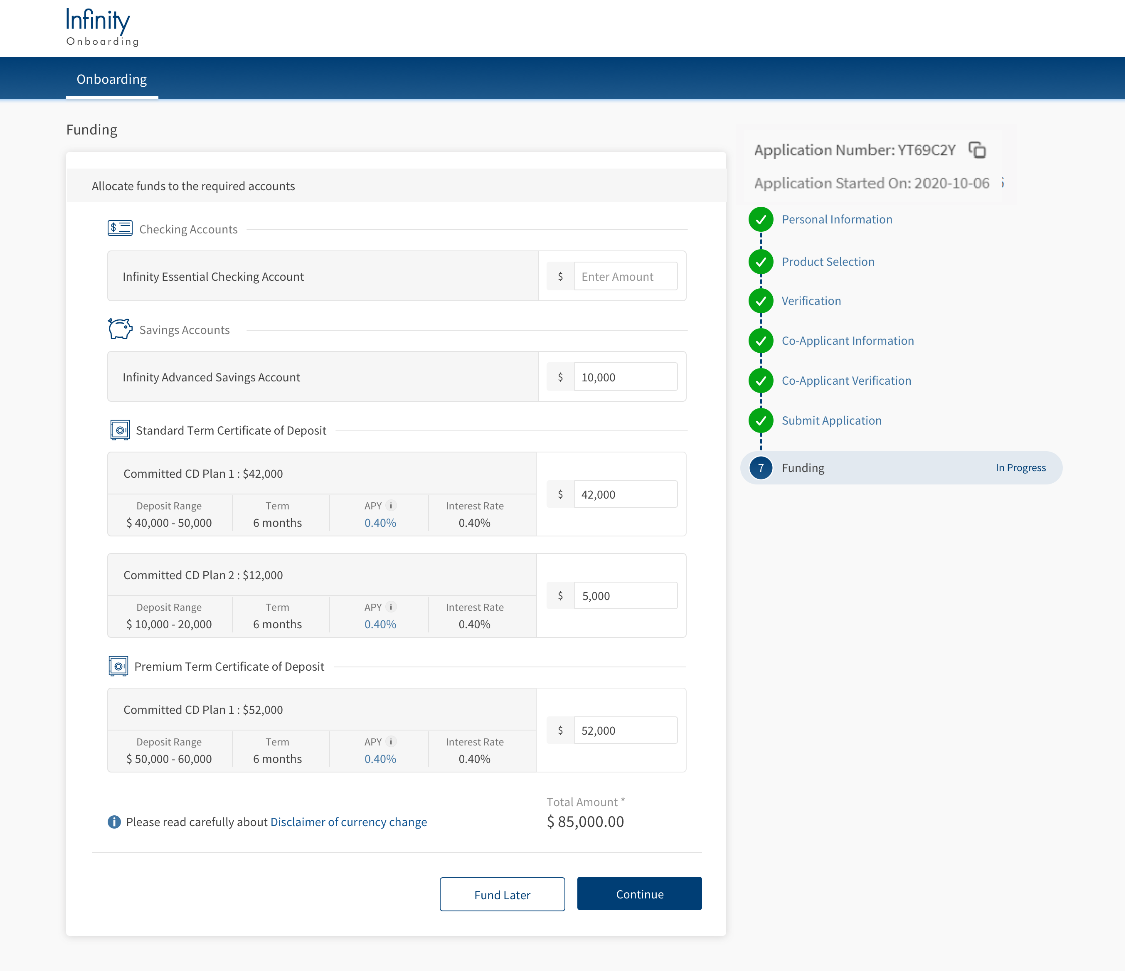
The Allocate funds to the required accounts section appears. It displays the accounts that you selected along with the account details.
- For each account displayed, type the amount that you want to fund for an account in the Enter Amount field.
- If you have selected any of the Term deposit products, the Deposit Amount field is pre-filled with the amount you provided in the Product Selection section. You can still modify the amount, if required.
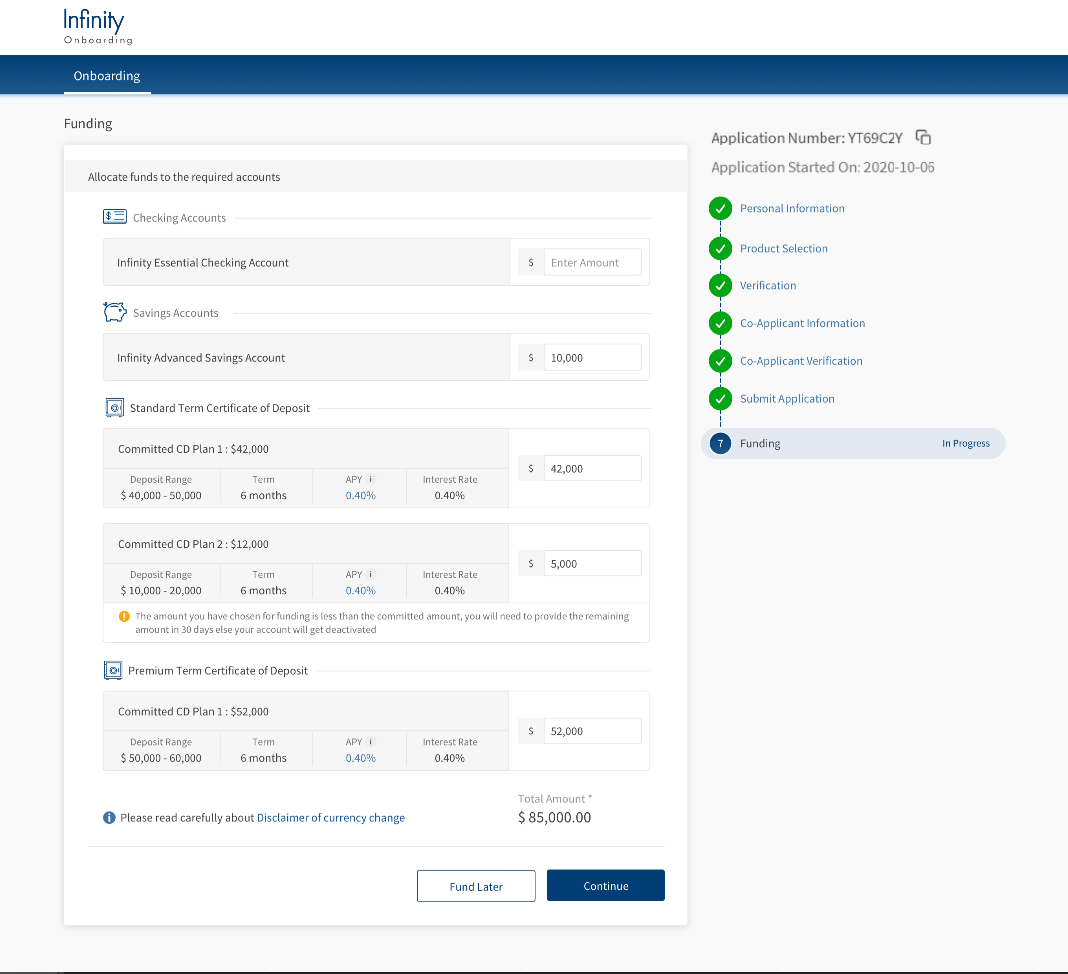
- If the deposit amount value provided is less than preferred amount, you will see a warning message that the remaining amount must be funded within 90 days. Similarly, if the deposit amount value provided is greater than the preferred amount, you will see a message that the excess amount will be treated separately in terms of rate of interest. Also, if you have not entered any value or entered 0 in the Deposit Amount field, it is considered that you are not funding the accounts.

- Check the Total Amount value and click Continue.NOTE:
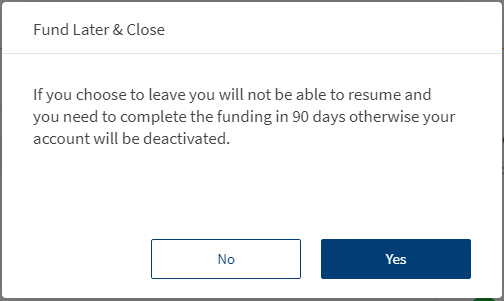
- Before clicking Continue, if you want to fund later, click Fund Later. The Fund Later & Close tab appears.

If you agree with the content, click Yes. Otherwise, click No. - After you choose to fund later, you cannot resume the funding flow. The resume flow is not supported for Funding.
- Before clicking Continue, if you want to fund later, click Fund Later. The Fund Later & Close tab appears.
- On click of Continue, the app prompts you to select the payment type by using which you want to fund the selected products.
If you are an existing customer, you can choose to fund either from an existing account or from an external account. Otherwise, if you are a prospect or new user, the app displays payment methods through external accounts only.

- Select an appropriate option and click Continue.
 Fund with existing account: This option helps you to fund the selected products from your existing accounts.
- When you select the Fund with existing accounts option, the Funding – Access Code section appears.
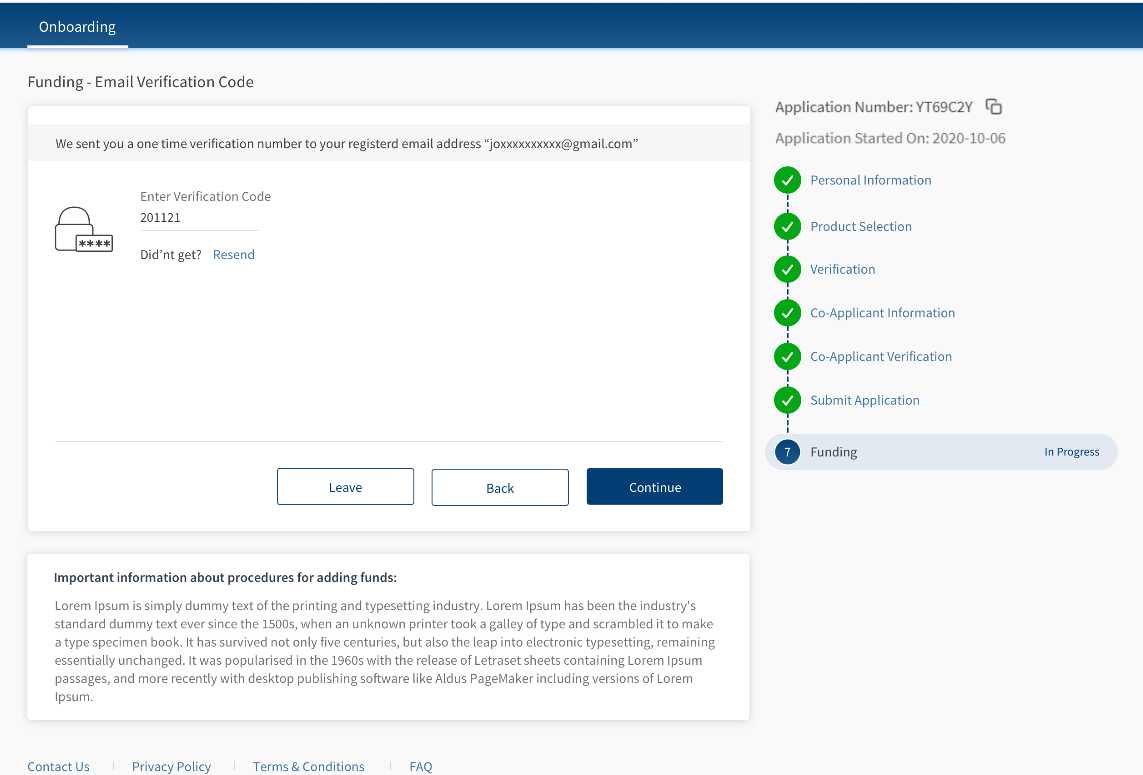
You will receive a six-digit secure access code on the registered phone number.
NOTE: This screen is MFA (Multi factor authentication) driven OTP Verification section and is optional. A bank can choose to show or hide this section by configuring in the Spotlight app.
- In the Enter Access Code field, type the code that you received.
NOTE: If you did not receive the secure access code, click Resend. The app resends the security code to your phone number.
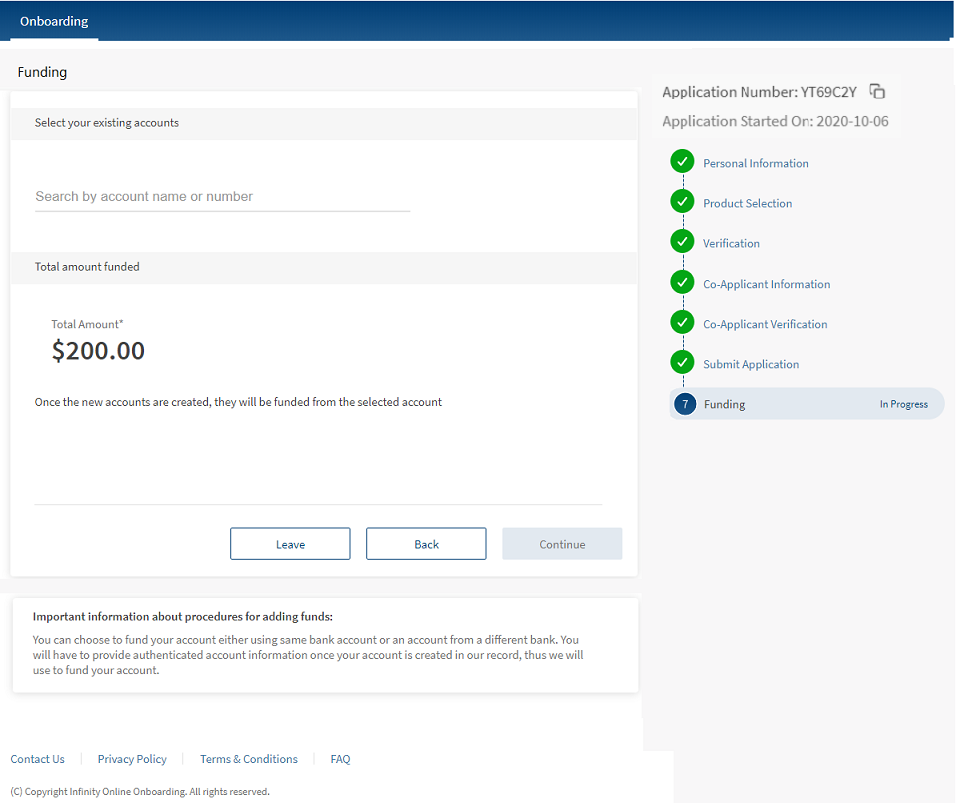
- After typing the secure access code, click Continue. The Select your existing accounts section appears.

- Search for your account by either your Account Name or Account Number.
- After selecting the account, click Continue. The Fund Account(s) section appears.
The Fund Account(s) section contains the funding details.
_thumb_0_48.png)
- If the funding details are correct, confirm them by clicking Continue. The Funding Acknowledgment section appears.
_thumb_0_48.png)
- The Funding Acknowledgment section contains a Reference Number and Funding Request Details. You can use the reference number to contact the nearest branch for further queries.
NOTE: The reference number is same as the application number shown during the process of opening an account.
- When you select the Fund with existing accounts option, the Funding – Access Code section appears.
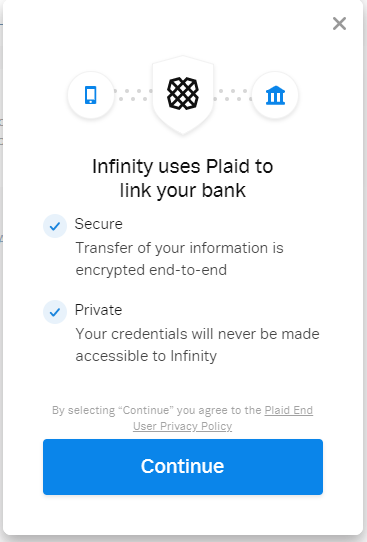
- Fund with external accounts automatically: Plaid integration is used to connect to your external bank accounts.
- When you select this option, the following tab appears.

- Click Continue. The Select your bank tab appears.

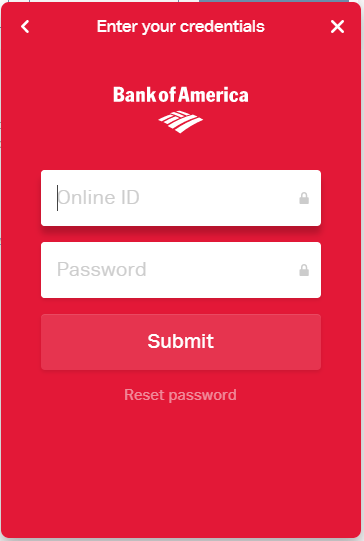
- Search for your bank and select it. The Enter your credentials tab appears.

- The Enter your credentials tab prompts you to provide your Online ID and Password. After typing your credentials, click Submit.
NOTE: If you forgot your password or want to change your password, click Reset password.
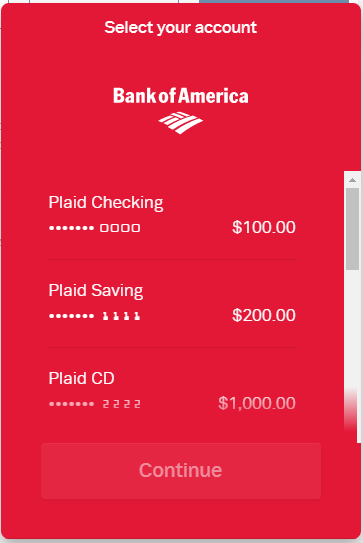
Upon successful sign in, the Select your account tab appears.
_thumb_0_48.png)
It displays the available accounts and the account balance of the respective accounts.
- Select an account that contains sufficient balance to fund the selected products. If the account contains insufficient balance, the app throws an error saying that the account balance is low.
- After selecting an account, click Continue. The Funding – Access Code section appears.
You will receive a six-digit secure access code to the registered phone number.
NOTE: This screen is MFA (Multi factor authentication) driven OTP Verification section and is optional. A bank can choose to show or hide this section by configuring in the Spotlight app.
- In the Enter Access Code field, type the code that you received.
NOTE: If you did not receive the secure access code, click Resend. The app resends the security code to your phone number.
- After typing the secure access code, click Continue. The Fund Account(s) section appears.

The Fund Account(s) section contains the funding details.
- If the funding details are correct, confirm them by clicking Continue. The Funding Acknowledgment section appears.

The Funding Acknowledgment section contains a Reference Number and Funding Request Details. You can use the reference number to contact the nearest branch for further queries.
NOTE: The reference number is same as the application number shown during the process of opening an account.
- When you select this option, the following tab appears.
- Fund with external accounts manually:
- When you select the Fund with external accounts manually option, the Funding – Access Code section appears.
This screen is MFA (Multi factor authentication) driven OTP Verification section and is optional. A bank can choose to show or hide this section by configuring in the Spotlight app. - You will receive a six-digit secure access code to the registered phone number.
- In the Enter Access Code field, type the code that you received.
NOTE: If you did not receive the secure access code, click Resend. The app resends the security code to your phone number.
- After typing the secure access code, click Continue. The Enter your bank account details section appears.
_thumb_0_48.png)
- Select your account type from the list and type your Account Number and Routing Number in the respective fields.
- After providing your bank details, click Continue. The Fund Account(s) section appears.
_thumb_0_48.png)
The Fund Account(s) section contains the funding details.
- If the funding details are correct, confirm them by clicking Continue. The Funding Acknowledgment section appears.
The Funding Acknowledgment section contains a Reference Number and Funding Request Details. You can use the reference number to contact the nearest branch for further queries.
NOTE: The reference number is same as the application number shown during the process of opening an account.
- When you select the Fund with external accounts manually option, the Funding – Access Code section appears.
NOTE:- If you want to change the funding details, click Back and revisit the process.
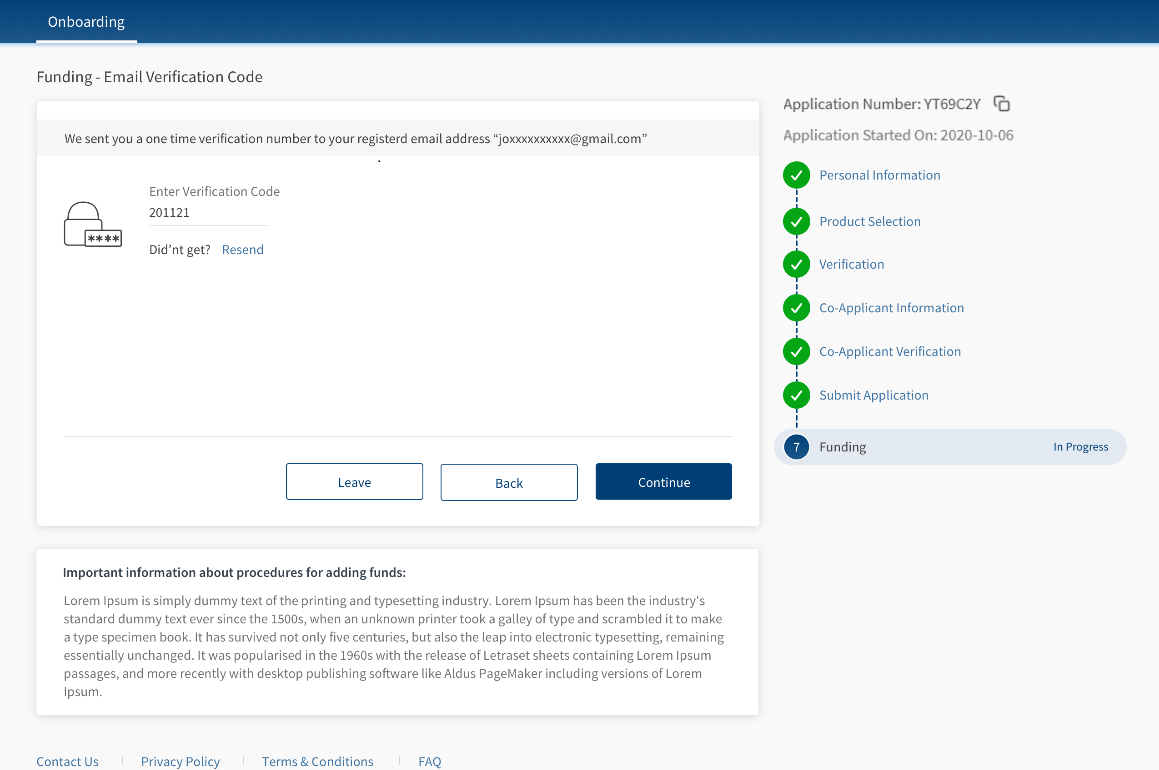
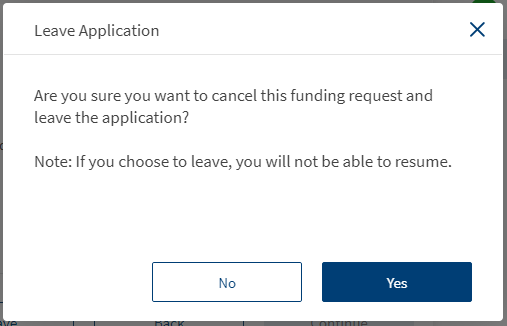
- If you want to quit the funding process, click Leave. The Leave Application tab appears.

If you agree with the content, click Yes. Otherwise, click No. - After you choose to leave the application, you cannot resume the funding flow. It is because the Onboarding app does not support the resume flow for Funding. However, you can fund your accounts by using the Transfer Money feature of the Retail Banking app.
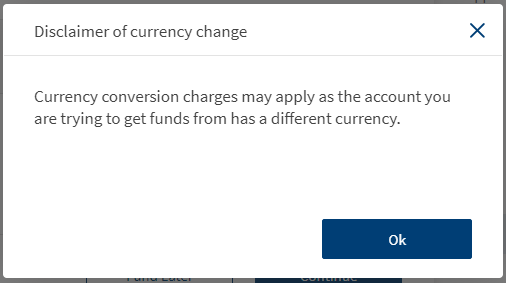
- If you are trying to fund a product from an account whose currency is different from the selected product, the Disclaimer of currency usage option appears in the following sections during the Funding flow.
- Allocate funds to the required accounts
- Type of Account for Funding
- Fund Account(s)

This option provides a disclaimer that the currency conversion may apply as the From Account and To Account contain two different currencies.
Experience APIs
The following APIs are shipped as part of this feature:
| API | Description |
|---|---|
| createFunding | This API creates a Funding application in Journey Manager (a separate JS module in the Journey manager). The data passed to the Journey Manager includes parent application ID. |
| updateFundingStatus | This API updates the status of the Funding application in the Funding module of the Journey Manager. The possible values of the funding status are Initiated, OptedOut, and Opted. |
| updateFundingType | This API updates the Funding type. The possible Funding type values are Inter and Intra. |
| updateFundingAllocation | This API updates the Funding allocation products and the amount provided by the user. |
| getFundingType | This API fetches the Funding type set by the user. |
| updatePaymentDetails | This API updates the payment details for the funding request. The payment details include account type, debit account number, routing number, currency and so on. |
| getFundingProducts | This API retrieves the products selected by the user for funding. This API is used to re-populate the data, while the user navigates back to the client app. |
| getProductsSelected | This API retrieves the product selected by the user based on the application ID. The product is retreived from the customer application and the Party backend system. |
Configurations
The system administrator will have the capability to configure this module from the Spotlight app. For more information about configuring the Funding module, click here.
Extensibility
By using the Extensibility feature, you can customize the modules based on your requirements. For more information, refer to Extensibility.
Add Bookmark
save your best linksView Bookmarks
Visit your best links BACK
BACK


Are you sure you want to log-off?